
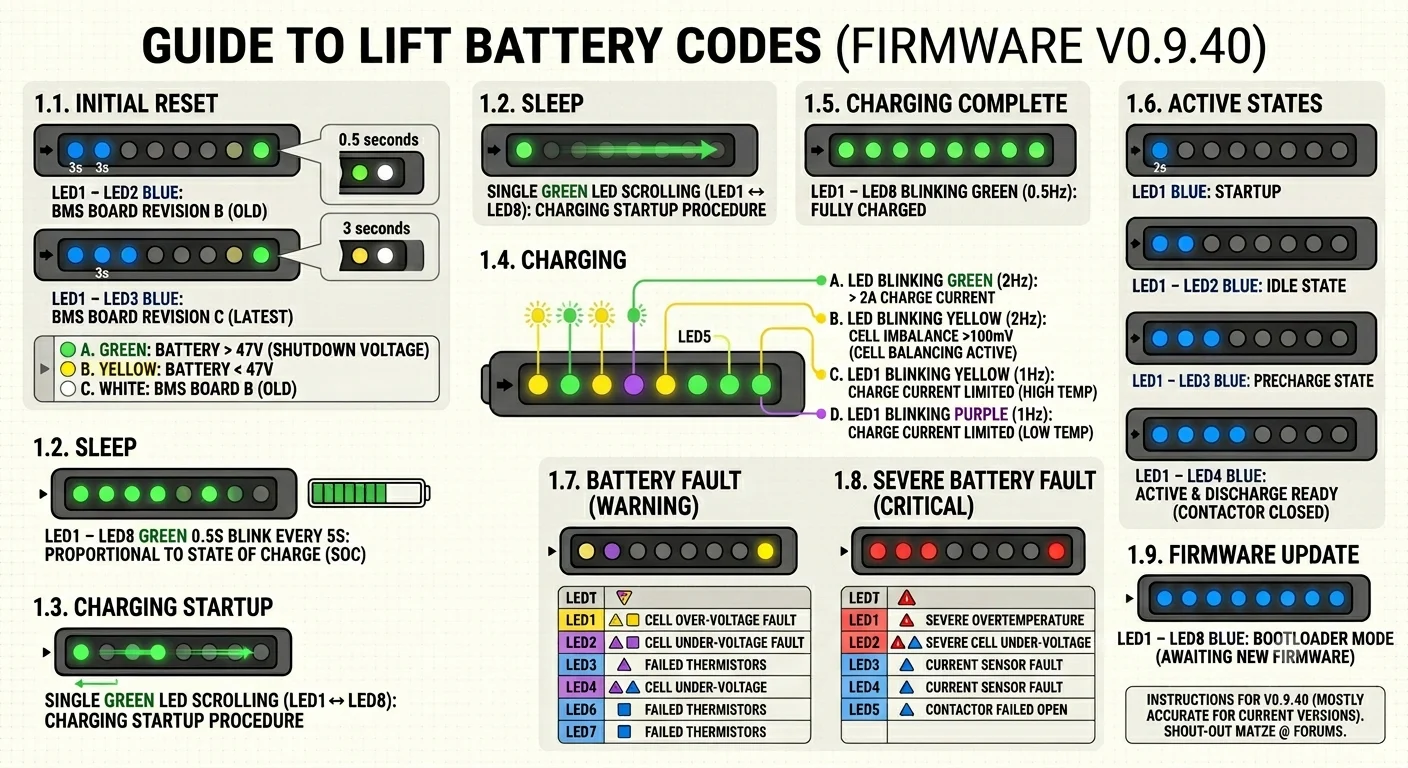

Lift Foils batteries talk to you through eight LEDs, and almost nobody is told how to listen. This page decodes every pattern: what the colours mean, which faults stop you riding, and which ones are only a warning.
Read the lights with the handle facing you. LED8 is the one that tells you whether something is wrong. Yellow on LED8 means a battery fault is active. Red on LED8 means a severe fault and the battery will not operate. LED1 to LED7 then tell you which fault it is.
These indications are documented for firmware version V0.9.40 and are mostly accurate for current firmware. Huge shout-out to Matze on the forums for putting the original reference together.
Initial reset
| Light pattern | What it means |
|---|---|
| LED1 to LED2 blue for 3 seconds | BMS board revision B (old) |
| LED1 to LED3 blue for 3 seconds | BMS board revision C (latest) |
| LED8 green, 0.5 seconds after the blue | Battery voltage is above the 47 V shutdown voltage |
| LED8 yellow, 0.5 seconds after the blue | Battery voltage is below the 47 V shutdown voltage |
| LED8 white, 0.5 seconds after the blue | BMS board revision B (old) |
Sleep
LED1 to LED8 blink green for half a second every 5 seconds. The number lit is proportional to the battery state of charge.
Charging startup
A single green LED scrolls between LED1 and LED8. The battery is running its charging startup procedure.
Charging
| Light pattern | What it means |
|---|---|
| LED1 to LED8 green | Proportional indication of battery state of charge |
| One LED blinking green at 2 Hz | More than 2 amps of charging current is flowing into the pack |
| One LED blinking yellow at 2 Hz | Cell voltage imbalance over 100 mV is reducing the charge rate. Cell balancing is active |
| LED1 blinking yellow at 1 Hz | Charge current is limited because the battery is too hot |
| LED1 blinking purple at 1 Hz | Charge current is limited because the battery is too cold |
Charging complete
LED1 to LED8 blink green at 0.5 Hz. The pack is fully charged.
Active states
| Light pattern | What it means |
|---|---|
| LED1 blue | Startup, lasts about 2 seconds |
| LED1 to LED2 blue | Idle |
| LED1 to LED3 blue | Precharge, lasts a few seconds |
| LED1 to LED4 blue | Active and ready for discharge, contactor closed |
Battery fault codes (LED8 yellow)
LED8 yellow means a battery fault is active. Read LED1 to LED7 to find out which one.
| LED | Yellow | Purple | Blue |
|---|---|---|---|
| LED1 | Cell over-voltage | Cell under-voltage | Failed thermistors |
| LED2 | Pack over-voltage | Pack under-voltage | Pack voltage sense |
| LED3 | Cell over-temperature | Cell under-temperature | – |
| LED4 | Charge current envelope exceeded | Discharge current envelope exceeded | – |
| LED5 | Power connector over-temperature | Cell voltage reading mismatch, meaning internal voltage calibration is off | – |
| LED6 | Pre-charge timeout | 12 V output fault, meaning a possible short circuit on the 12 V output | – |
| LED7 | Charger voltage mismatch | Charger current mismatch | – |
Severe battery fault codes (LED8 red)
LED8 red means a severe battery fault is active and battery operation is prevented for safety reasons. Read LED1 to LED5 to find out which one.
| LED | Red | Blue |
|---|---|---|
| LED1 | Severe overtemperature, the battery has measured extreme temperatures previously | Contactor failed, the contactor has failed open |
| LED2 | Severe cell under-voltage, it is not safe to recharge the battery | Current sensor fault, the sensor is no longer functioning properly |
| LED3 | Severe cell group capacity loss, too many cells have been disconnected or have failed to operate safely | – |
| LED4 | Open cell group, an entire cell group is disconnected from the voltage stack | – |
| LED5 | Open cell voltage sense connection, the BMS cannot reliably measure one or more cell group voltages | – |
Firmware update
LED1 to LED8 blue means the battery is in bootloader mode, waiting for new firmware.
New to eFoiling? Start with what an eFoil is, how it works and what it costs.







Leave a Reply
You must be logged in to post a comment.